Setting up WireGuard VPN client on an OpenWRT router
Step-by-step instructions for protecting your entire home network using a VPN tunnel.
WireGuard is a modern VPN protocol known for its high performance, simple configuration, and robust encryption. Setting up WireGuard directly on your OpenWRT router lets you protect all your home network traffic through a VPN without having to configure each device individually. In this guide, we'll walk you through connecting your router to a VPN server step by step.
Connecting to the router and installing required packages
Connect to your router via SSH:
ssh root@192.168.1.1
Note
Replace the IP address with your router's address
Update the package list and install WireGuard:
opkg update
opkg install wireguard-tools
Getting the configuration file
Download the WireGuard configuration file from your account dashboard.
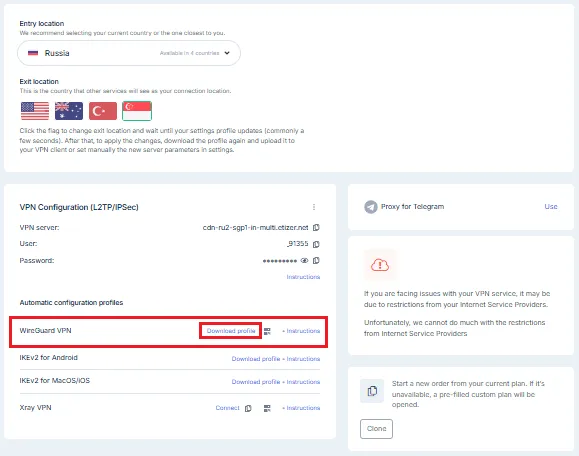
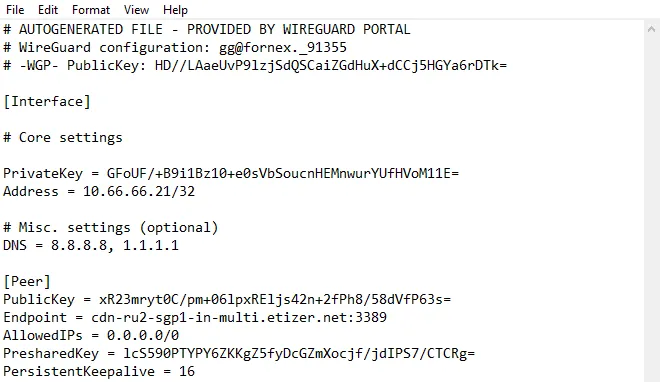
The file will be named something like fnx-wg-79224.conf and will contain the following parameters:
Configuring the network interface
Open the network configuration file:
vi /etc/config/network
Add the following lines to the end of the file, replacing the values in curly braces with data from your configuration file:
config interface 'wg0'
        option proto 'wireguard'
        option private_key '{PrivateKey}'
        list addresses '{Address}'
        list dns '{DNS_1}'
        list dns '{DNS_2}'

config wireguard_wg0
        option public_key '{PublicKey}'
        option endpoint_host '{Endpoint_host}'
        option endpoint_port '{Endpoint_port}'
        list allowed_ips '{AllowedIPs}'
        option preshared_key '{PresharedKey}'
        option persistent_keepalive '{PersistentKeepalive}'
Save your changes and close the file.
Note
In vi, press Esc, then type :wq and press Enter.
Configuring firewall rules
Open the firewall configuration file:
vi /etc/config/firewall
Add the following rules to the end of the file:
config zone
        option name 'wg'
        option masq '1'
        option output 'ACCEPT'
        option forward 'REJECT'
        option input 'REJECT'
        option mtu_fix '1'
        option network 'wg0'

config forwarding
        option src 'lan'
        option dest 'wg'
These rules create a separate security zone for WireGuard and allow traffic forwarding from your local network (LAN) into the VPN tunnel.
Save and close the file.
Restarting network services
Apply the changes by restarting the network and firewall:
/etc/init.d/network restart
/etc/init.d/firewall restart
Wait 10-15 seconds for the services to fully restart.
Configuring routing
Add routing rules to redirect all internet traffic through WireGuard:
ip route add 0.0.0.0/1 dev wg0
ip route add 128.0.0.0/1 dev wg0
These two commands together cover the entire IPv4 address space and redirect all traffic through the wg0 interface. Using two /1 routes instead of a single /0 route preserves the original default route, which improves connection stability.
Note
These rules don't persist after a router reboot. To automatically apply the routes after reboot, add these commands to /etc/rc.local before the exit 0 line.
Verifying the connection
From any device connected to your router, open an IP checking website in your browser:
https://2ip.io
or run this command from the router:
curl who.fornex.host/ip
The IP address should match your VPN server's IP address, not your actual ISP-assigned IP.
Setup complete! All traffic from devices connected to your router will now go through the encrypted WireGuard VPN tunnel.
Help
If you have any questions or need assistance, please contact us through the ticket system — we're always here to help!